In our increasingly digital world, email has become a vital means of communication. Whether you’re using it for personal or professional purposes, understanding the inner workings of emails can provide valuable insights. One such aspect is the email header, a hidden treasure trove of information that can reveal crucial details about the origin and journey of an email. In this comprehensive guide, we will explore the process of viewing email headers in Gmail, one of the most popular email platforms. By the end, you’ll have a clear understanding of how to access and interpret email headers, empowering you with valuable knowledge for various purposes.

Table of Contents
What are Email Headers?
Email headers consist of various fields that provide crucial information, including the sender’s and recipient’s email addresses, the date and time of transmission, the subject line, and much more. Additionally, email headers contain a series of trace information, known as Received headers, which record the servers through which the email passed during its transmission.
By examining email headers, you can uncover essential details such as the IP addresses of the sending and receiving servers, the route the email took, and even any potential signs of email spoofing or phishing attempts. It’s important to note that email headers can be quite technical and may require some understanding of the underlying protocols to interpret fully.
Accessing Email Headers in Gmail
Now that we have a basic understanding of email headers, let’s explore how to access them within the Gmail interface. Gmail provides a straightforward process to view email headers, enabling users to access this valuable information with just a few clicks. Follow the steps below to unveil the hidden details within an email’s header:
- Open Gmail and sign in to your account.
- Navigate to the email whose header you wish to view.
- Open the email by either double-clicking on it or selecting it and clicking the “Open” button.
- Once the email is open, locate the “More” button, represented by three vertically aligned dots, typically found in the upper-right corner of the email window.
- Click on the “More” button to reveal a dropdown menu.
- From the dropdown menu, select the “Show Original” option.
- A new tab or window will open, displaying the email’s full header information, typically in plain text format.\

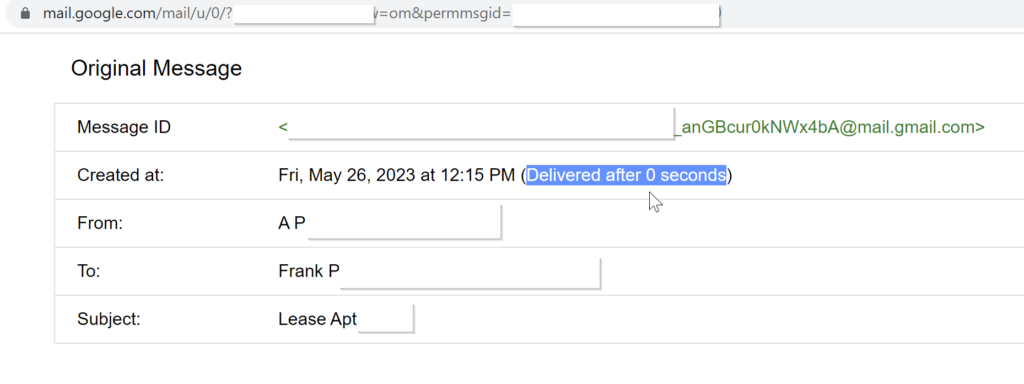
By following these simple steps, you can now access and examine the email headers within Gmail. It’s worth noting that Gmail provides an easy-to-use interface, allowing users to toggle between the original email and its header information seamlessly.
Interpreting Email Headers
Interpreting email headers can seem daunting at first, especially if you’re unfamiliar with the technical jargon. However, with a basic understanding of the key fields and a step-by-step approach, you can gain valuable insights from email headers.
- Return-Path: This field indicates the email address to which any non-delivery-related notifications should be sent. It is often the same as the “From” address but can differ in certain cases.
- Received: This field is a series of entries that record the path the email took from the sender’s device to the recipient’s inbox. Each entry represents a different server that handled the email, with the most recent entry appearing at the top. By analyzing the “Received” headers, you can trace the email’s journey and identify any suspicious or unexpected server hops.
- From: The “From” field displays the email address of the sender. However, it’s crucial to note that email addresses can be easily forged or spoofed, so additional scrutiny is required when assessing the sender’s authenticity.
- To: The “To” field indicates the email address of the recipient to whom the email was sent. This field can help verify the intended recipient of the email.
- Subject: The “Subject” field simply displays the subject line of the email, providing a glimpse into the email’s content.
- Date: The “Date” field reveals the date and time when the email was sent by the original sender. This information can be valuable when investigating the chronology of events.
- Message-ID: The “Message-ID” field is a unique identifier assigned to each email. It serves as a reference point and can be useful for tracking or tracing purposes.
Email Header Data in Tables
| Field | Description |
|---|---|
| Return-Path | Specifies the email address for non-delivery reports |
| Received | Records the path and servers the email passed through |
| From | Email address of the sender |
| To | Email address of the recipient |
| Subject | Subject line of the email |
| Date | Date and time of email transmission |
| Message-ID | Unique identifier for the email |
By analyzing these key fields and their corresponding values, you can gain valuable insights into the origin, journey, and authenticity of an email. However, interpreting email headers can be complex, especially in cases involving multiple servers and intricate routing paths.
It is worth mentioning that certain advanced scenarios, such as emails sent via encrypted or anonymized channels, may obfuscate some header information or make it more challenging to analyze. In such cases, seeking expert assistance or utilizing specialized tools may be necessary to fully understand the email headers.
Using Email Headers for Investigation and Troubleshooting
The ability to view and interpret email headers is not limited to satisfying curiosity or understanding the technical aspects of email delivery. Email headers can serve as valuable tools for various investigations and troubleshooting scenarios. Let’s explore a few use cases where email headers play a crucial role:
- Identifying the Source of Spam or Phishing: Spam emails and phishing attempts are unfortunate realities of the digital landscape. By carefully examining the email headers, you can often trace the source of these malicious messages. The “Received” headers provide a breadcrumb trail of servers, allowing you to identify potential points of compromise or unauthorized access.
- Verifying Email Authenticity: Email spoofing, where a sender disguises their identity, is a common tactic used in phishing attacks. By scrutinizing the email headers, you can check for discrepancies or anomalies that might indicate a spoofed email. Paying particular attention to the “Received” headers and comparing them against legitimate emails can help identify discrepancies and reveal signs of forgery.
- Troubleshooting Email Delivery Issues: Email delivery can sometimes encounter hiccups due to various factors. When facing email delivery problems, examining the email headers can provide valuable insights into the possible causes. By analyzing the “Received” headers, you can identify potential bottlenecks, server timeouts, or misconfigured email servers that may be impeding successful email delivery.
Remember, while email headers can provide valuable clues and insights, they are just one piece of the puzzle. In more complex scenarios, it may be necessary to involve email service providers, cybersecurity professionals, or forensic experts to conduct a thorough investigation.
Email headers hold a wealth of information, often hidden from plain sight, that can provide valuable insights into the origin, journey, and authenticity of an email. By learning how to view and analyze email headers in Gmail, you have equipped yourself with a powerful tool to enhance your email security. This may also be used to investigate suspicious activities, and troubleshoot email delivery issues.
