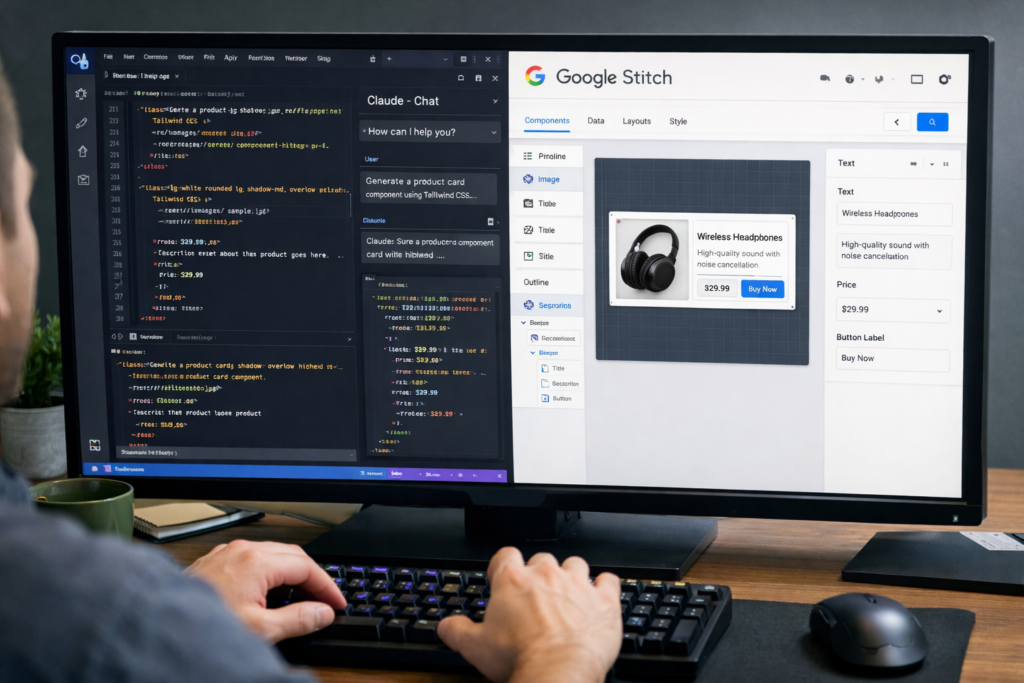
Google Stitch lets you generate production ready UI designs from text prompts using Gemini. Claude Code, Anthropic’s CLI based coding assistant, can connect to Stitch through the Model Context Protocol (MCP) and pull those designs directly into your development workflow. No copy pasting screenshots. No manually exporting HTML. You describe a screen, Stitch generates the design, and Claude Code fetches it and turns it into working code.
Setting this up takes about 10 minutes, but the process has a few gotchas that can cost you an hour if you hit them unprepared. This guide walks through every step, covers both authentication methods, and flags the common mistakes I ran into during setup.
What You Need Before Starting
Before diving into configuration, make sure you have these prerequisites ready.
Node.js installed on your machine. The MCP proxy runs via npx, which ships with Node. If you can run node --version in your terminal, you’re set.
Claude Code extension for VS Code installed and working. Open the Extensions panel (Ctrl+Shift+X), search for Claude Code, and install it if you haven’t already.
A Google Cloud project with the Stitch API enabled. You can create a project at console.cloud.google.com. If you already have a project, you just need to enable the Stitch API on it.
A Stitch API key or Google Cloud CLI (gcloud) installed for OAuth based authentication. I’ll cover both approaches below.
Two Ways to Authenticate: API Key vs. OAuth
Google Stitch supports two authentication methods for MCP. Each has tradeoffs.
API Key is simpler. You generate a key in the Stitch settings, paste it into your config, and you’re done. The key doesn’t expire. This is the approach I recommend for most developers getting started.
OAuth via gcloud is more secure and follows Google Cloud IAM best practices. However, tokens expire every hour and need manual refresh unless you use the stitch-mcp proxy (which handles refresh automatically). If you’re working in a team or corporate environment, OAuth is the better long-term choice.
For this walkthrough, I’ll show both. Pick whichever fits your situation.
Getting Your API Key
Open stitch.withgoogle.com and sign in. Click your profile picture in the top right corner. Select Stitch Settings from the dropdown. Navigate to the API Key section. Click Create Key. Copy the generated key immediately and store it somewhere secure. You’ll need it in the next step.
Setting Up gcloud OAuth (Alternative)
If you prefer OAuth, run these commands in your terminal.
bash
gcloud auth login
gcloud config set project YOUR_PROJECT_ID
gcloud auth application-default login
gcloud beta services mcp enable stitch.googleapis.com --project=YOUR_PROJECT_ID
Each command will prompt you to authenticate in your browser. Complete the OAuth flow for each one.
Adding the Stitch MCP Server to Claude Code
Now for the actual setup. You have three options depending on how you want to manage the configuration.
Option 1: Use the Interactive Wizard (Recommended for First Timers)
The stitch-mcp package by David East includes an init wizard that handles authentication, project selection, and config generation in one step. Open a terminal in VS Code and run the following.
bash
npx @_davideast/stitch-mcp init --client claude-codeThe wizard walks you through Google Cloud CLI setup, authentication, project selection, IAM permissions, and MCP config generation. When it finishes, your Claude Code config is updated automatically.
After the wizard completes, reload your VS Code window to pick up the new config. Open the Command Palette (Ctrl+Shift+P) and run Developer: Reload Window.
Option 2: Add via Claude Code CLI (Quick and Direct)
If you already have your API key or gcloud configured, you can add the server directly from the terminal.
Using the stdio proxy (recommended, handles token refresh automatically):
bash
claude mcp add-json stitch "{\"command\":\"npx\",\"args\":[\"-y\",\"@_davideast/stitch-mcp\",\"proxy\"],\"env\":{\"STITCH_PROJECT_ID\":\"your-project-id\"}}" -s userUsing the remote HTTP endpoint directly (simpler, requires API key):
bash
claude mcp add stitch --transport http https://stitch.googleapis.com/mcp --header "X-Goog-Api-Key: YOUR-API-KEY" -s userThe -s user flag installs the server at the user level, making it available across all your projects. Use -s local instead if you want it scoped to the current project only.
After running either command, reload your VS Code window.
Option 3: Edit the Config File Manually
If you prefer editing configuration files directly, open C:\Users\YourUsername\.claude.json (Windows) or ~/.claude.json (macOS/Linux). Add the Stitch server under mcpServers.
Stdio proxy config:
json
{
  "mcpServers": {
    "stitch": {
      "command": "npx",
      "args": ["-y", "@_davideast/stitch-mcp", "proxy"],
      "env": {
        "STITCH_PROJECT_ID": "your-project-id"
      }
    }
  }
}
HTTP endpoint config (API key):
json
{
  "mcpServers": {
    "stitch": {
      "type": "http",
      "url": "https://stitch.googleapis.com/mcp",
      "headers": {
        "X-Goog-Api-Key": "YOUR-API-KEY"
      }
    }
  }
}
Save the file and reload your VS Code window.
Verifying the Connection
After reloading VS Code, open the Claude Code chat panel. Type /mcp and check the MCP servers list. You should see stitch listed with a healthy status.
If Stitch doesn’t appear, see the Troubleshooting section below.
Once it shows up, test the connection by asking Claude Code: “List my Stitch projects.” If everything is configured correctly, it should return your Stitch projects and their IDs.
Using Stitch with Claude Code: A Quick Workflow
With the MCP connection live, here’s what a typical design to code workflow looks like.
Step 1: Create a design in Google Stitch. Go to stitch.withgoogle.com and describe your UI. For example, “A modern SaaS landing page with a hero section, feature grid, and pricing table.” Stitch generates a high fidelity design using Gemini.
Step 2: Ask Claude Code to fetch the design. In the Claude Code chat panel, type something like: “Use the Stitch MCP to fetch the screens from my ‘LandingPage’ project and generate a React app with Tailwind CSS.”
Step 3: Claude Code retrieves the design metadata (colors, typography, layout, HTML) through the MCP connection and generates production-ready code in your workspace.
Step 4: Review and refine. The generated code lands in your project directory. Run it locally, compare it to the original design, and ask Claude Code for adjustments.
The key tools Claude Code can access through the Stitch MCP include create_project, generate_screen_from_text, get_screen, get_screen_code, get_screen_image, and build_site.
Troubleshooting Common Issues
I ran into several issues during setup. Here’s what fixed each one.
Stitch doesn’t appear in /mcp after adding it
This is the most common issue. Claude Code’s VS Code extension caches the MCP config on startup. You must reload the VS Code window after any config change. Open the Command Palette (Ctrl+Shift+P) and run Developer: Reload Window. Simply closing and reopening the chat panel is not enough.
“MCP server stitch already exists” error
This happens when you have a Stitch entry in both your local project config (.mcp.json) and your user config (~/.claude.json). Remove one of them.
bash
claude mcp remove stitch -s localOr if you want to keep the local one:
bash
claude mcp remove stitch -s userHTTP transport server not connecting
The remote HTTP transport to stitch.googleapis.com/mcp can be unreliable in some environments. Switch to the stdio proxy approach instead, which runs a local process that handles the connection.
bash
claude mcp remove stitch -s user
claude mcp add-json stitch "{\"command\":\"npx\",\"args\":[\"-y\",\"@_davideast/stitch-mcp\",\"proxy\"]}" -s user
OAuth token expired
If you used the gcloud OAuth method without the proxy, tokens expire every hour. The stdio proxy (@_davideast/stitch-mcp proxy) handles automatic token refresh. Switch to it to avoid this problem.
API key not working
Double check that the Stitch API is enabled on your Google Cloud project. Run the following to verify.
bash
gcloud beta services mcp enable stitch.googleapis.com --project=YOUR_PROJECT_IDAlso confirm the API key was copied correctly with no extra spaces or line breaks.
Server shows in CLI but not in VS Code chat
This is a known issue with slow starting npx based MCP servers. The /mcp panel may show “No servers configured” even though the server is actually connected. Try asking Claude Code to “List my Stitch projects” anyway. If it works, the server is fine and it’s just a UI display issue.
Security Considerations
A few things to keep in mind when working with Stitch MCP.
Never commit your API key to a public repository. If your .claude.json or .mcp.json file contains an API key, add it to your .gitignore. Better yet, use environment variables.
The stdio proxy is more secure than hardcoded API keys because it uses gcloud application default credentials that are stored separately from your project files.
If you accidentally expose your API key (for example, in a terminal screenshot or commit history), rotate it immediately in Google Stitch settings and update your config.
Quick Reference: Config Locations
Here’s where each config file lives across platforms.
| Config | Windows | macOS/Linux |
|---|---|---|
| Claude Code user config | C:\Users\YourName\.claude.json | ~/.claude.json |
| Claude Code project config | .mcp.json in project root | .mcp.json in project root |
| VS Code workspace MCP | .vscode/mcp.json in project root | .vscode/mcp.json in project root |
Final Thoughts
Google Stitch paired with Claude Code through MCP creates a fast path from idea to working UI code. The setup is straightforward once you know about the VS Code reload requirement and the differences between the HTTP and stdio transport options. For most developers, I’d recommend the stdio proxy approach with @_davideast/stitch-mcp since it handles authentication refreshes automatically and tends to be more reliable than the direct HTTP connection.
The Stitch API is free to use, and Claude Code’s MCP support is included with the extension. If you’re already using Claude Code for development, adding Stitch takes a few minutes and opens up a design to code pipeline that eliminates a lot of manual work.
For more productivity tools and tech guides, check out our other articles on BlogPandit.
FAQ: Google Stitch MCP with Claude Code in VS Code
Do I need a paid Google account to use Stitch MCP? No. Google Stitch is free to use. You need a Google Cloud project with the Stitch API enabled, but there’s no charge for the API itself.
Can I use the same Stitch MCP config in Cursor or other editors? Yes. The MCP server configuration format is nearly identical across Claude Code, Cursor, and other MCP compatible clients. The same stitch-mcp proxy works in all of them.
What’s the difference between the stdio proxy and the HTTP transport? The stdio proxy runs a local Node.js process that manages the connection to Google’s servers, including automatic token refresh. The HTTP transport connects directly to stitch.googleapis.com/mcp but requires manual token management if using OAuth. For most users, the stdio proxy is more reliable.
Why doesn’t Stitch appear in /mcp after I add it? Claude Code caches MCP server configurations when VS Code starts. You need to run Developer: Reload Window from the Command Palette after any config change. This is the single most common setup issue.
Can I scope the Stitch MCP to a single project? Yes. Use -s local instead of -s user when adding the server via the CLI. This stores the config in your project’s .mcp.json file instead of the global ~/.claude.json.

I appreciate your detailed explanation.
Awesome! Its genuinely remarkable post, I have got much clear idea regarding from this post
There is definately a lot to find out about this subject. I like all the points you made